When you open File Explorer and go to This PC, you see drives and common folders—and often shortcuts pinned under Devices and drives. Putting a work folder, favorite program, Control Panel tool, or Windows app into This PC by hand usually means registry edits that are slow and easy to get wrong.
This PC Manager in Windows Manager gathers those tasks in one window: add files, folders, system utilities, and Windows apps; enable or disable existing items (disabled ones appear in dark gray); edit title, path, parameters, and icon in the bottom Edit area. You can also drag .exe / .lnk files or folders from Explorer into the list. System folder items generally cannot be edited, but they can be disabled; most changes can be restored to system defaults (on Windows 11 the Restore button is hidden because the Folders group is no longer shown the same way).
Below: how to open it, add and edit items, and what to watch for. Screenshots match the UI labels. The top-right ? shows a short tip; the footer Help Online link opens this article.
1. What can This PC Manager do?
- Add shortcuts to This PC. Use Add File / Add Folder, or drag programs, shortcuts, and folders from Explorer into the list.
- Add utilities and Windows apps. Add Utility opens Windows Utilities so you can pick Shell / tool items; Add Windows App selects installed UWP / Store apps and writes them into the This PC namespace.
- Enable or disable items. Hide items you do not need with Disable (dark gray in the list), then Enable later—safer than deleting right away.
- Edit appearance and launch options. In the bottom Edit area, change title, path, and parameters; click Change for a new icon, then Save. File Explorer’s This PC view updates accordingly.
- Show items in the Folders category. Check Show item in Folders category for 'This PC' to place supported items in the Folders group.
- Desktop icons and quick check. Desktop Icon Settings opens the system desktop-icon dialog; the This PC button opens the system This PC view so you can verify results immediately.
It complements Navigation Pane Manager under the same File Explorer Tweaker area: this tool manages items in the This PC view; for the left navigation pane, use Navigation Pane Manager. For look-and-feel, pair with Visual Customizer.
2. How to open This PC Manager
In the Windows Manager main window:
Customization → File Explorer Tweaker → This PC Manager
It opens as a separate window (caption “Windows Manager - This PC Manager”). Download a trial from the download page if needed. When writing namespaces and CLSIDs, run as administrator so permissions and live refresh work correctly.
3. Main window
The window is roughly divided into:
- Left list: This PC–related items by group. Windows 10 shows Folders and Devices and drives groups; Windows 11 usually shows only device/drive-style groups. Disabled items appear in dark gray.
- Right button area: Add File, Add Folder, Add Utility, Add Windows App, Desktop Icon Settings, Enable / Disable, Remove / Remove All, (Win10) Restore, This PC; top-right ? for a short tip and diagram; footer Help Online opens this article. Before adding a file, you can pre-fill launch parameters in the Parameter box.
- Bottom Edit area: For editable items, change Title, Path, and Parameter; use Change for the icon, then Save.
- Checkbox under the list: Show item in Folders category for 'This PC'—available when the selected item supports that option.
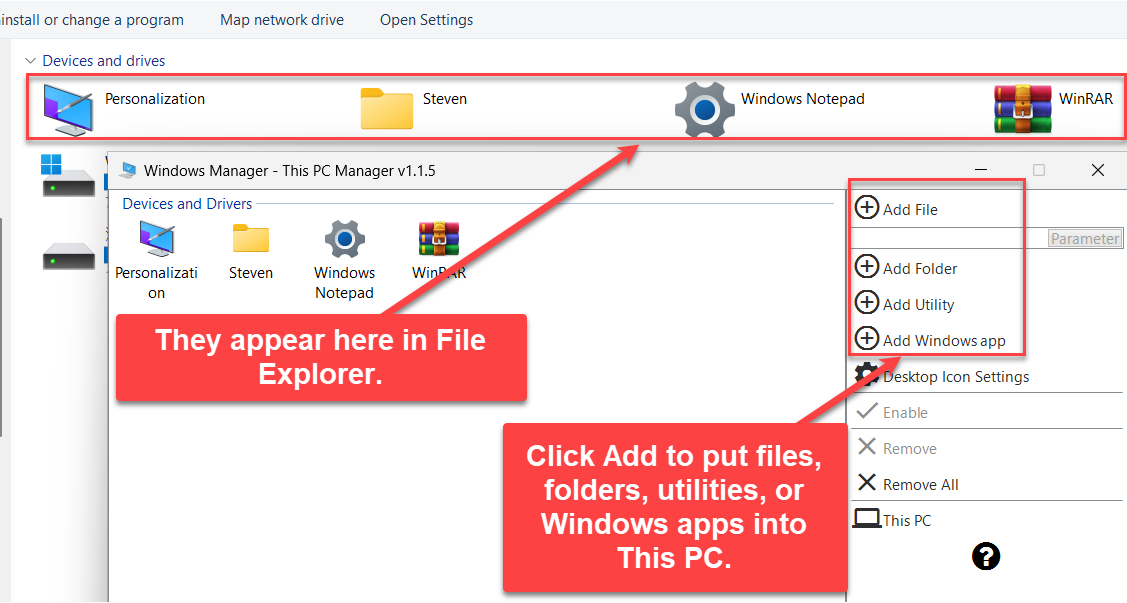
The figure shows how items added in the manager appear as shortcuts in File Explorer’s This PC view for one-click access.
4. How to add items
Use any of these methods to write an item into the This PC namespace:
- Add File: Click Add File and choose an
.exeor.lnk. Shortcuts resolve to their target path and parameters; you can also fill the Parameter box on the right before adding. - Add Folder: Click Add Folder and pick a directory. If the folder has a custom icon via
desktop.ini, the tool tries to reuse it; otherwise it uses the default folder icon. - Drag and drop: Drag files (
.exe/.lnk) or folders from Explorer into the left list (including from a non-elevated Explorer into an elevated window). - Add Utility: Opens Windows Utilities (selection mode) so you can pick Shell / known-folder or tool items and write them back to This PC.
- Add Windows App: Opens the Windows app picker; selected apps are added via
shell:appsFolder\…. The current version uses a fixed system gear icon (Shell32.dll, 314) by default; after adding, use Change in the Edit area to pick another icon.
After a successful add, the new item usually appears in This PC quickly. If not, press F5 to refresh, or click toolbar This PC to reopen and compare.
5. Edit title, path, parameter, and icon
Select an editable custom item, then use the bottom Edit group:
- Change Title (the name shown in This PC).
- Change Path (use the browse button beside the path to pick another file or folder).
- Change Parameter (for launch items that need command-line arguments).
- Click Change to open the icon picker and choose a file and index.
- Click Save to write changes; the list icon and File Explorer’s This PC view refresh.
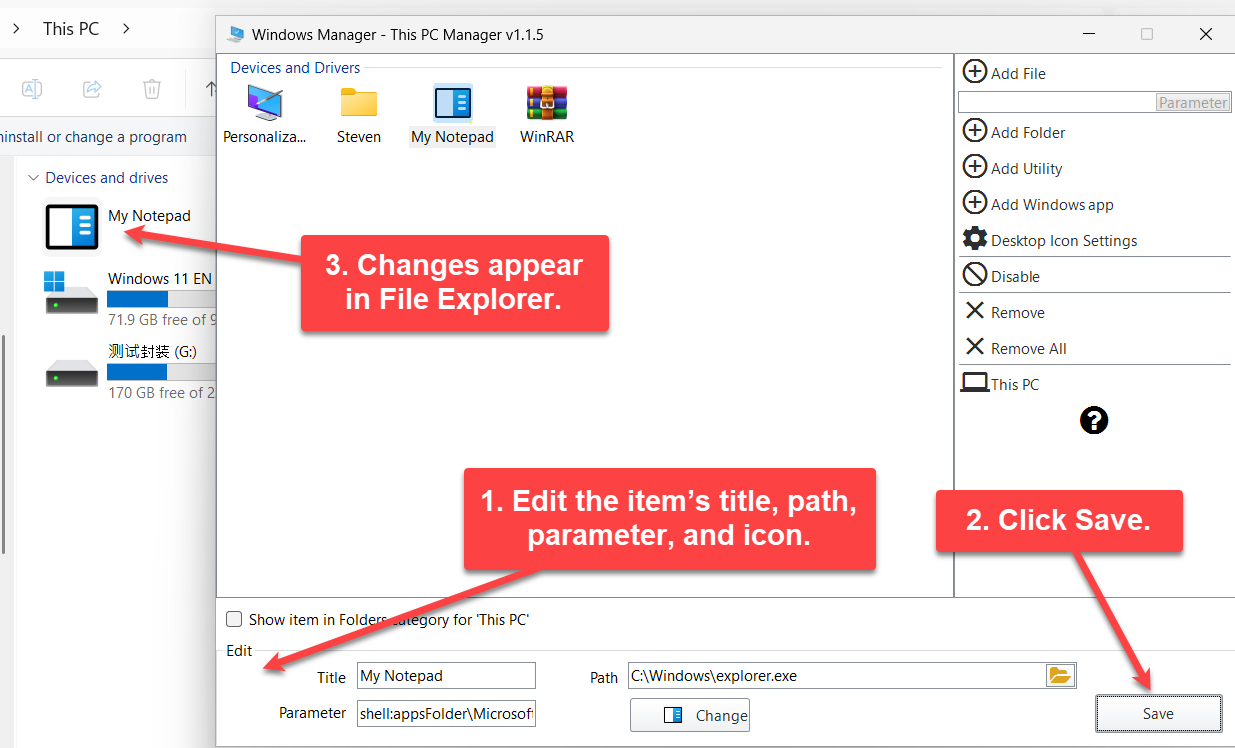
The figure shows that after you change title, path, parameters, or icon and click Save, the matching item in File Explorer’s This PC view updates name and appearance.
For system folder / system ClassID items, the Edit area usually stays disabled so you cannot alter system entries by mistake. Those items can typically only be enabled or disabled—not retitled or retargeted.
6. Enable, disable, remove, and restore
Enable / Disable
Select an item in the list, then:
- Disable: Hide it from This PC; it appears in dark gray in the list so you can enable it later.
- Enable: Show it again.
Remove / Remove All
For custom items, click Remove (confirm “Are you sure you want to delete the selected item?”); Remove All clears removable items in the list (confirm before proceeding). System folder items usually cannot be removed—only disabled.
Restore (mainly Windows 10)
Restore resets related settings to system defaults (confirm “Are you sure you want to restore all settings to system default?”). On Windows 11 the button is hidden because the Folders group is no longer shown in the same way.
7. Desktop Icon Settings and the This PC button
- Desktop Icon Settings: Opens the system Desktop Icon Settings dialog so you can show or hide This PC, Recycle Bin, and similar desktop icons—complementary to namespace items inside the This PC view.
- This PC: Opens the system This PC view in one click so you can check whether list changes already appear in Explorer.
- Show item in Folders category for 'This PC': For items that support it, checking this places them in the Folders category; availability can differ for system vs. custom items—follow whether the checkbox is enabled.
8. Notes
- System folder items cannot be edited. You can disable them, but you generally cannot change title/path or remove them the way you remove custom items.
- Default Windows app icon. Add Windows App currently uses a fixed Shell32 gear icon; for a custom look, use Change after adding. Some UWP logos are light or transparent; on a light This PC background they may not stand out—prefer a higher-contrast icon.
- Administrator rights. Creating/deleting namespaces and changing CLSIDs may need elevation; drag-and-drop already supports dropping from a lower-privilege Explorer into an elevated window.
- Verify immediately. Use toolbar This PC or open Explorer yourself; if nothing changes, refresh (F5) or restart Explorer.
- Win10 / Win11 differences. Windows 11 does not show Restore or the Folders group the same way; trust what you see on your system.
- Distinct from Navigation Pane Manager. This tool only changes the This PC view; for the left navigation tree use Navigation Pane Manager.
9. Typical workflow
- Customization → File Explorer Tweaker → This PC Manager.
- Use Add Folder (or drag-and-drop) for a work directory; add other entry points with Add File / Add Utility / Add Windows App as needed.
- Select a custom item, adjust title and icon in Edit, then Save.
- Disable system or custom items you do not need for now; Remove custom items you are sure you do not want.
- Click This PC to confirm in Explorer; use Desktop Icon Settings if you also want to adjust desktop icons.
Try it now
This PC Manager belongs to the same customization and maintenance toolbox as the rest of Windows Manager. More on the product page; for the left navigation pane, pair with Navigation Pane Manager; for appearance and icons, use Visual Customizer.
Get started: Download Windows Manager — open Customization → File Explorer Tweaker → This PC Manager, add one or two favorite folders or programs, confirm they appear under This PC, then fine-tune titles and icons.
