When you open File Explorer, the column on the left is the Navigation Pane: Home / Quick Access, This PC, Network, OneDrive, and any folders you pin there. Built-in items are hard to remove, and custom pins often mean registry edits or scattered right-click tricks. Pinning a work folder at the top, hiding unused system entries, or dropping a folder so it appears on the left is not simple out of the box.
Navigation Pane Manager in Windows Manager brings these tasks into one window: add folders or system Shell items, reorder with Up / Down, check On Top, disable some system items, delete custom ones, and in Options turn off the navigation pane, auto-expand to the current folder, or choose where File Explorer opens. In-app help notes that you can use the add buttons or drag folders from Explorer into the list—and that default navigation items cannot be removed.
Below: how to open it, add and sort items, disable or delete, and what to watch for. Screenshots match the UI labels. The top-right ? shows a short tip; the footer Help Online link opens this article.
1. What can Navigation Pane Manager do?
- Pin favorite locations on the left. Use Add Folder or drag-and-drop to pin project folders, download libraries, or data drives under the navigation root or under This PC.
- Add system Shell / known folders. Use Add Utility (Windows Utilities) to pick Shell or known-folder items—clearer than typing
shell:::by hand. - Sort the way you work. Use Up / Down to reorder; when adding, check On Top so new items appear above system entries.
- Hide or restore some system items (Windows 11). For Gallery, OneDrive, This PC, Network, Removable devices, and similar, use Disable / Enable (some items may prompt you to restart Explorer).
- Edit custom item appearance. In the bottom Edit area, change title, path, and icon, then Save.
- Tune open behavior. In Options, turn off the navigation pane, auto-expand to the current folder, and open File Explorer to Quick Access / Home, This PC, Downloads, or a custom location.
It complements This PC Manager under the same File Explorer Tweaker area: this tool manages the left navigation pane; to change folders/drives shown under This PC, use This PC Manager. For look-and-feel, pair with Visual Customizer.
2. How to open Navigation Pane Manager
In the Windows Manager main window:
Customization → File Explorer Tweaker → Navigation Pane Manager
It opens as a separate window (caption “Windows Manager - Navigation Pane Manager”). Windows 10 and Windows 11 launch the matching UI: Win11 emphasizes Disable / Enable for system items; Win10 also offers Add Default Command and Restore all. Download a trial from the download page if needed. When changing namespaces and system CLSIDs, run as administrator so permissions and live refresh work correctly.
3. Main window
The window is roughly divided into:
- Top toolbar: On Top, Add Folder, Add Utility, Up / Down, (Win11) Disable / Enable, Delete, This PC, Options; top-right ? for a short tip and diagram; footer Help Online opens this article. Win10 also has Add Default Command and Restore all.
- Center tree: root node “Navigation Pane”, then Home / Quick Access, Gallery, OneDrive, This PC, Network, Removable devices, and your custom items; custom items can also hang under This PC.
- Bottom Edit area: for custom items, change Title, Path, use Change for the icon, then Save. System defaults cannot be edited or deleted.
4. How to add items
First select the Navigation Pane root or the This PC node in the tree (only these two allow adding), then pick a method:
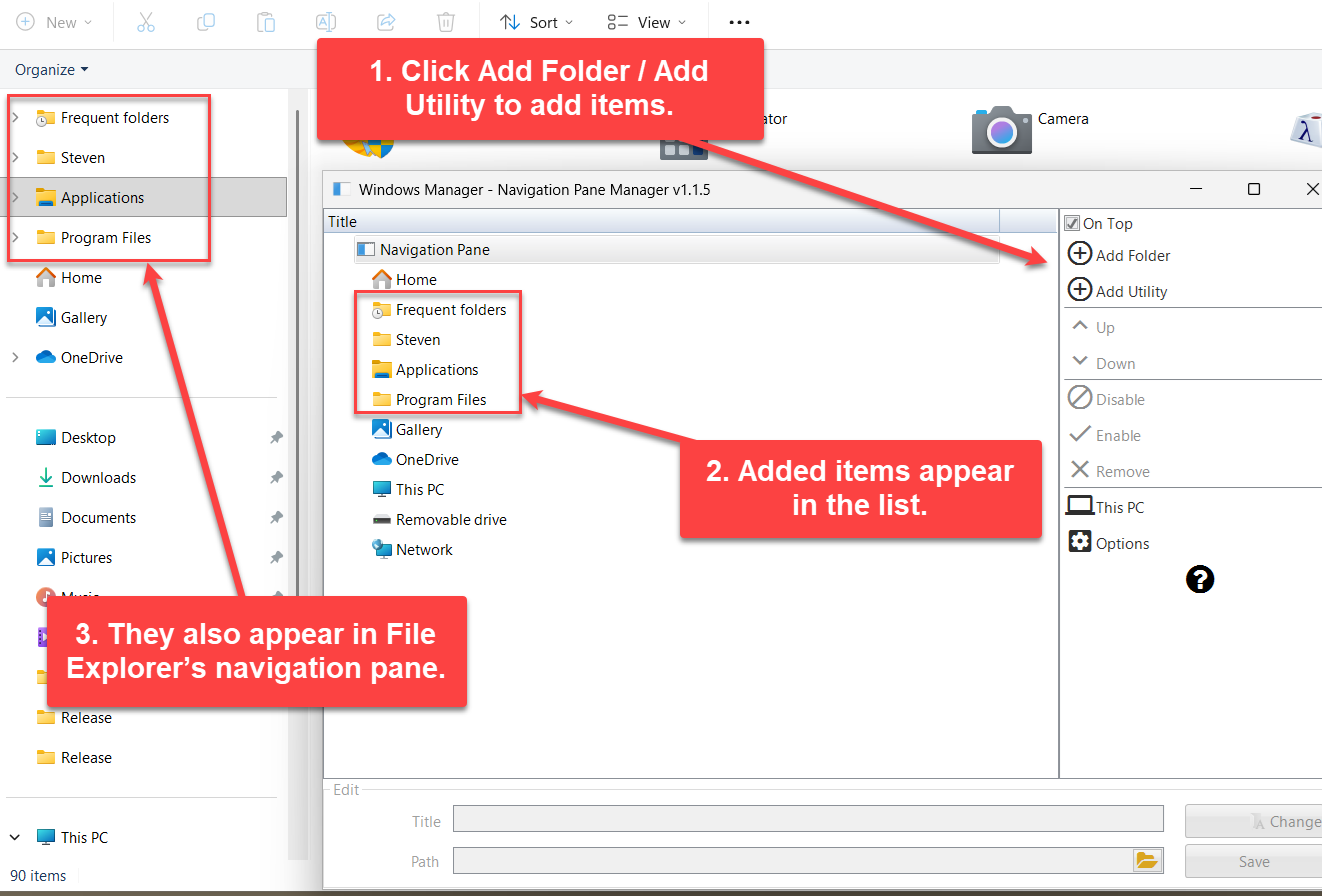
- Add Folder: click toolbar Add Folder and choose a directory. The program creates the namespace entry and refreshes the list.
- Drag and drop: drag a folder from Explorer into the list (including from a non-elevated Explorer into an elevated window). Folders only.
- Add Utility: opens Windows Utilities filtered to Shell and known folders; selecting an item writes it back to the navigation pane.
- (Win10) Add Default Command: quickly add common system locations from the built-in default-command menu.
Before adding, you can check On Top: checked places new items higher (above system items); unchecked places them lower. After a successful add, the left side of Explorer usually updates quickly; if not, press F5 or restart Explorer.
5. Order and On Top
- Select a custom item, then use Up / Down to change relative order. Moving past Quick Access / Home or the first This PC child disables Up so you cannot cross disallowed positions.
- System defaults usually cannot be reordered with Up / Down (those buttons stay disabled).
- On Top mainly affects the initial position of newly added items; use Up / Down to fine-tune existing ones.
Toolbar This PC opens the system This PC view so you can confirm the left navigation already matches.
6. Disable, enable, and delete
Disable / Enable (Windows 11)
Select a hideable system or custom item, then:
- Disable: hide Gallery, OneDrive, or custom items from the pane; for This PC, Network, and similar, attributes may be written and you may be asked to restart Explorer; Removable devices can stop being delegated in the navigation pane.
- Enable: restore visibility. Home / Quick Access–style root entries usually cannot be disabled.
Delete
Only custom items can be deleted: select one, click Delete, confirm, and the matching CLSID / namespace is removed. System defaults (Home, This PC, etc.) leave Delete disabled—consistent with the tip that default items cannot be removed.
On Win10, Restore all resets related settings to Windows defaults (confirm first so you do not lose a large set of custom pins).
7. Edit title, path, and icon
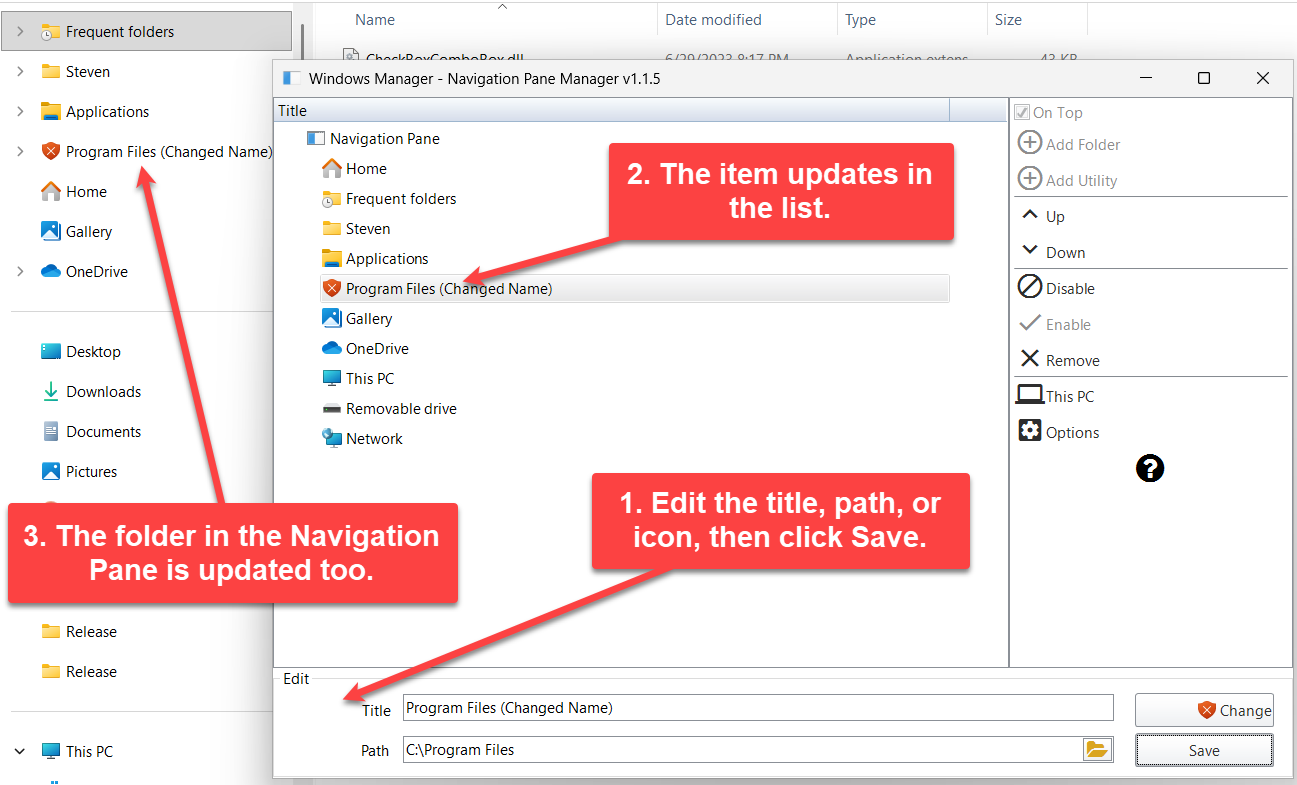
With a custom item selected, the bottom Edit group is available:
- Change Title (name shown in the navigation pane).
- Change Path (browse again with the folder button beside the path).
- Click Change to pick an icon file and index.
- Click Save to write changes; the list and Explorer refresh accordingly.
For system-class items the Edit area stays disabled so you cannot alter system CLSIDs by mistake.
8. Options
Click toolbar Options to open the dialog. Common settings include:
- Turn off Navigation Pane: hide File Explorer’s left navigation bar (useful for very narrow windows or special layouts; uncheck and save when you need it back).
- Automatically expand to the current folder in Navigation Pane: when browsing deep folders, the left tree expands to the current location.
- Open File Explorer to: Quick Access (Win10) / Home, This PC, Downloads, or a Custom location (valid path required). After save, a message confirms the setting took effect.
When finished, click Save; if unsure, click Cancel to close without applying.
9. Notes
- Default items cannot be deleted. System navigation entries can only be disabled/hidden when supported—not removed like “delete This PC.”
- Select the correct parent before adding. You must select the Navigation Pane root or This PC; otherwise add buttons stay disabled.
- Disabling This PC / Network may require restarting Explorer. Follow the prompt; finish unsaved Explorer windows first.
- Administrator rights. Creating/deleting namespaces and changing CLSID order may need elevation; drag-and-drop supports low-privilege Explorer into an elevated window.
- Verify right away. Use toolbar This PC or open Explorer yourself to check the left list; refresh or restart Explorer if nothing changes.
- Win10 / Win11 toolbars differ slightly. Follow the toolbar on your OS; the tip and this online help apply to both.
10. Typical workflow
- Customization → File Explorer Tweaker → Navigation Pane Manager.
- Select the root node, check On Top, and use Add Folder (or drag-and-drop) for a work folder.
- Use Up / Down to place it where you like; optionally edit title and icon under Edit, then Save.
- (Win11) Disable Gallery / OneDrive if unused; Delete custom items you no longer need.
- In Options, set open-to This PC or auto-expand as needed, then Save.
- Open File Explorer and confirm the left navigation matches your habits.
Try it now
Navigation Pane Manager sits with Windows Manager’s other customization and maintenance tools. See the product page for more; for desktop icons, themes, or folder colors, pair with Visual Customizer; for quick app launches, try JumpList Quick Launcher.
Get started: Download Windows Manager — open Customization → File Explorer Tweaker → Navigation Pane Manager, pin one or two favorite folders first, then fine-tune order and options.
