Right-click a pinned program on the Windows taskbar and you get a jump list—recent files, common actions, and so on. Handy, but rarely tailored to what you actually need. You might prefer Registry Editor, a project folder, or a handful of sites you open every day.
JumpList Quick Launcher in Windows Manager is built for that: assemble your own jump list, group programs, folders, links, and system tools, save it, and pin it to the taskbar. After that, a right-click on the icon is enough—no need to keep the setup window open.
Below we walk through the layout, how to add items, saving and pinning, plus multiple lists, backup, and a few settings worth knowing.
1. What can JumpList Quick Launcher do?
- Turn the taskbar into a personal launcher. Registry Editor, Steps Recorder, IP Configuration, document folders—keep frequent targets in one right-click menu instead of hunting through the desktop or Start menu.
- Organize with groups. The list uses a two-level structure (group + item), e.g. Tools / Folders / Files. The taskbar menu shows the same headings.
- Several ways to add items. Pick files and folders directly, or choose from the Start menu, Windows Utilities, Microsoft Store apps, and Favorites
.urllinks. - Run several lists side by side. Create multiple jump lists—each gets its own executable and taskbar pin. One for work, one for personal use, and so on.
- Configurations you can back up. Lists are stored in XML and can be backed up or restored in bulk after a reinstall or PC swap.
2. How to open JumpList Quick Launcher
In the Windows Manager main window:
Customization → JumpList Quick Launcher
A separate configuration window opens. If you have not installed the product yet, get the trial from the download page.
On first launch, if Windows has disabled tracking for Recent items and Frequent places in jump lists, the program asks whether to turn that back on. Custom jump lists will not work while it is off—choose Yes to continue.
3. Main window layout
The window has four main areas:
- Top toolbar: A drop-down on the left switches between jump lists; on the right are Create, Delete, Backup, Restore, Exit, and the ? help button.
- Left tree: Top-level nodes are groups (e.g. Tools, Folders); child nodes are items. Invalid paths appear in dark gray when the file or folder no longer exists.
- Right buttons: Add Group, Add File, Add Folder, Add URL, Add Start Menu, Add Utility, Add Windows app, plus Up, Down, Remove, and Remove All.
- Bottom edit area: Change title, path, and arguments for the selected item. The status bar shows the list name, item count, and the Maximum allowable number drop-down.
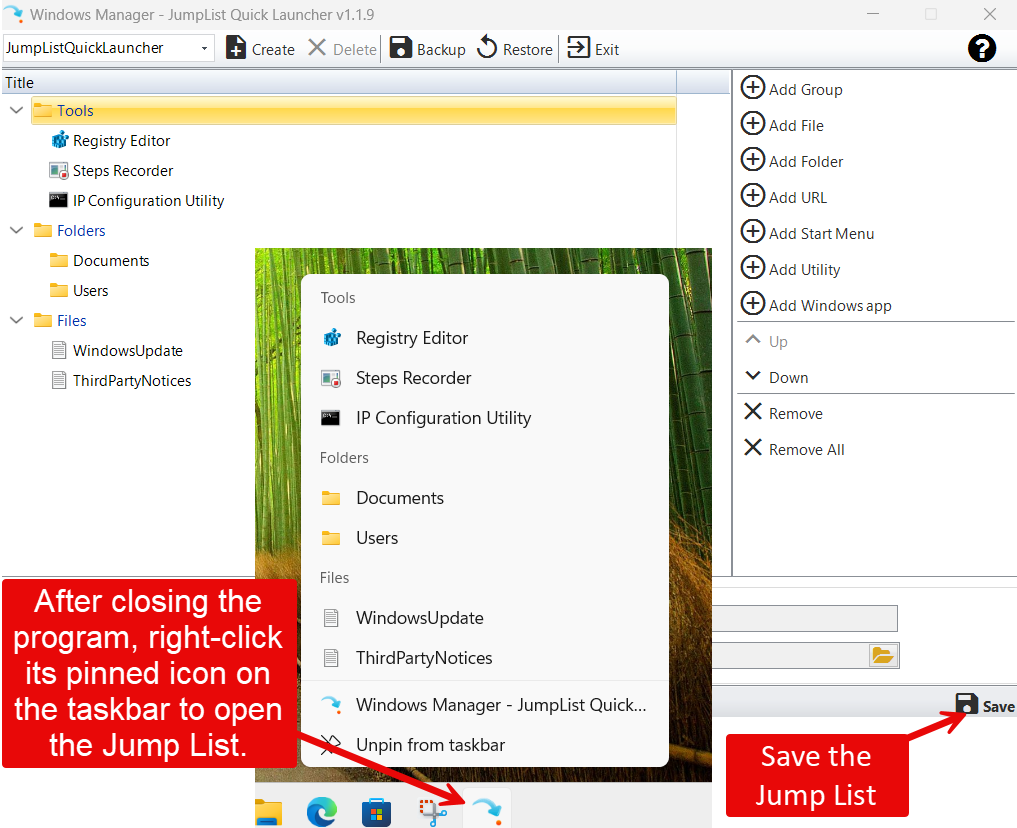
The ? tooltip spells out the basics: dark gray means an invalid target; open the jump list by right-clicking the pinned taskbar icon; you can also drag and drop items to reorder or move them between groups.
4. Building your jump list
4.1 Create a group first, then add items
The list is two levels deep: you need a group (root node) before adding items under it. Typical flow:
- Click Add Group, type a name (e.g. Tools or Work folders), and press Enter.
- Select that group, then use the buttons on the right to add items.
If there are no groups yet, Add File, Add Folder, and similar buttons stay disabled—add a group first.
4.2 Seven ways to add items
- Add File: Choose
.exe,.bat,.lnk, and similar files. You can also drag files into the tree (select a group first). - Add Folder: Browse or drag a folder; opening it launches File Explorer at that location.
- Add URL: Pick a
.urlfile from Favorites—handy for sites you use often. - Add Start Menu: Opens Start Menu Manager in selection mode; pick an installed app and name and path fill in automatically.
- Add Utility: Opens Windows Utilities—Registry Editor, Control Panel applets, MMC snap-ins, and other shell tools (with icons where applicable).
- Add Windows app: Choose a Microsoft Store / UWP app; it is stored as
explorer.exe shell:appsFolder\....
Icons are read automatically. Broken paths turn dark gray so you can fix or remove them before saving.
5. Edit and reorder
5.1 Item properties
With a child item selected, the bottom panel lets you edit:
- Title: The label shown in the jump list.
- Path: Executable, folder, or link file; use the browse button to pick a new target.
- Arguments: Command-line parameters—some utility entries need shell arguments here.
Changes update the tree live. When a group node is selected, path and arguments are disabled—groups are category headings only.
5.2 Change order
- Use Up and Down on the right.
- Drag and drop within a group or onto another group (groups cannot be nested under other groups).
- Right-click an item for the same move and remove actions.
The order in the tree is the order you see after saving, in the taskbar right-click menu.
6. Save and use from the taskbar
When the list looks right, click Save at the bottom. The program will:
- Write the configuration to an XML file next to the executable;
- Refresh the Windows jump list;
- Try to pin the program to the taskbar.
A message confirms the result. If pinning succeeded, you can close the setup window—from then on, right-click the taskbar icon to open your custom list and click any entry to launch it.
If auto-pin fails (permissions or policy), you are prompted to pin manually: right-click the program → Pin to taskbar, then try the jump list again.
Tip: The jump list belongs to that specific .exe. You can close the editor, but keep the taskbar pin—the menu comes from the icon, not from an open window.
7. Multiple jump lists
One list not enough? Create several, each with its own taskbar icon.
7.1 Create a new list
Click Create on the toolbar and enter a name (e.g. Office or DevTools). The app creates JumpListName.exe and matching XML in the install folder and opens a new instance for you to configure.
If the name already exists, you see “A jump list with this name already exists.”
7.2 Switch and delete
The top drop-down lists every jump list. Selecting one starts the matching JumpList*.exe if it is not running; if it is already open, you get a “running” notice.
In the main JumpListQuickLauncher window, the Delete menu lets you remove a child list—its .exe and .xml are deleted. Unpin the taskbar icon first if you no longer need it.
Advanced: Removing product metadata and renaming executables can give you distinct taskbar icons for each list. Also note: if the program runs from a removable drive (USB, etc.), Windows usually cannot pin it to the taskbar—install on a local disk for everyday use.
8. Backup and restore
The toolbar includes Backup and Restore for migration or reinstall:
- Backup: Copies all
JumpList*.exeandJumpList*.xmlin the install folder (except the main JumpListQuickLauncher.exe) to a folder you choose. The last backup path is remembered. - Restore: Copies files from your backup folder back into the install directory, overwriting matches.
After restore, pinned icons often still work on the same PC; on a new machine, pin the lists you need again.
9. Related settings
9.1 Maximum allowable number
The status bar drop-down (13–30) maps to the registry value JumpListItems_Maximum—how many entries Windows reserves for jump lists. Changes are written immediately and you see “The setting has been completed.”
Increase it if you plan a very long list; the default is fine for most setups.
9.2 Recent items must be enabled
If Windows turns off jump list tracking for recent items and frequent places (Settings → Personalization → Start, or registry Start_TrackDocs), custom lists cannot be applied. The program detects this at startup and offers to re-enable it—allow that, or saving will not work.
10. Notes
- Click Save after every edit—the taskbar menu does not update until you do.
- Dark gray entries point to missing files or folders; fix or remove them so the menu stays clean.
- Group names become section headings in the jump list—keep them short and clear.
- When drag-dropping files, select the target group first; groups cannot nest inside one another.
- If auto-pin fails, manual pinning is enough—the list content is already saved.
- Avoid running the tool from a USB stick long term; pinning may fail.
- Before deleting a child list, unpin its taskbar icon and confirm you no longer need the XML.
Tip: Start small—e.g. a Tools group with Registry Editor and IP Configuration. Use it for a few days, then add folders and links. Easier to maintain than stuffing everything in at once.
11. Workflows
First-time setup
- Customization → JumpList Quick Launcher → if prompted, enable recent-item tracking.
- Add Group → select the group → add utilities, folders, or files.
- Reorder with Up/Down or drag-and-drop → click Save.
- Close the window as suggested → right-click the taskbar icon → launch an item to verify.
Add a second list (e.g. Dev tools)
- Toolbar → Create → enter a name → configure in the new window.
- Save and pin → a second taskbar icon appears with its own menu.
Restore after reinstall or new PC
- Install Windows Manager and JumpList Quick Launcher.
- Toolbar → Restore → choose your backup folder.
- Open each list from the drop-down → pin to the taskbar if needed.
Try it now
JumpList Quick Launcher is for gathering scattered but frequent actions on the taskbar. It complements Startup Manager (boot items) and Settings Security (system entry points)—each handles a different job. See the product page for the full suite.
Get started: Download Windows Manager and open Customization → JumpList Quick Launcher to build your first taskbar shortcut menu.