Built-in Windows personalization can change wallpaper and accent color, but title bar height and color, window borders, icon spacing, scroll bars, system/drive/file type icons, and per-folder colors are often scattered—or require manual registry edits. Switching between Settings, Control Panel, and File Explorer is slow and easy to get wrong.
Visual Customizer in Windows Manager gathers common look-and-feel options in one window. The left pane switches among System Settings, Font & Size, System Icon, Other Icon, File Type Icon, Folder Colorizer, Theme Changer, Lock Screen Extractor, and Bing Images. The top caption is “Customize the visual appearance and interface styles of Windows”; the top-right ? opens a short tip and online help.
Below: what each module does and how to use it, with screenshots that match the UI labels.
1. What can Visual Customizer do?
- System look and title bar. In System Settings, adjust dark theme, transparency, wallpaper JPEG quality, title bar color and height, plus window borders, icon spacing, scroll bars, and more.
- System fonts and app text size. In Font & Size (Font Changer), change caption, icon, menu, and other system fonts, and scale Windows apps font size.
- Replace system and drive icons. In System Icon, customize shell icons (Desktop, This PC), drive-type icons (e.g. Hard Disk), and Control Panel item icons.
- Partition and library icons. In Other Icon, assign icons to individual partitions (C:, D:, …) or library folders.
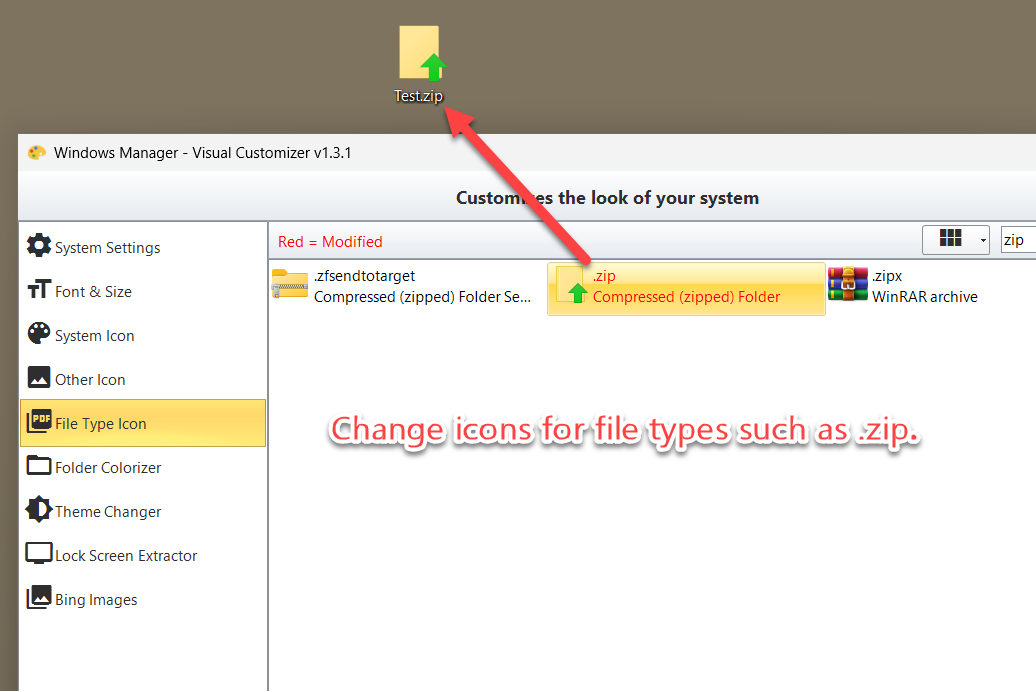
- File type icons. Change the default icon by extension (e.g. .zip); modified items are highlighted in red.
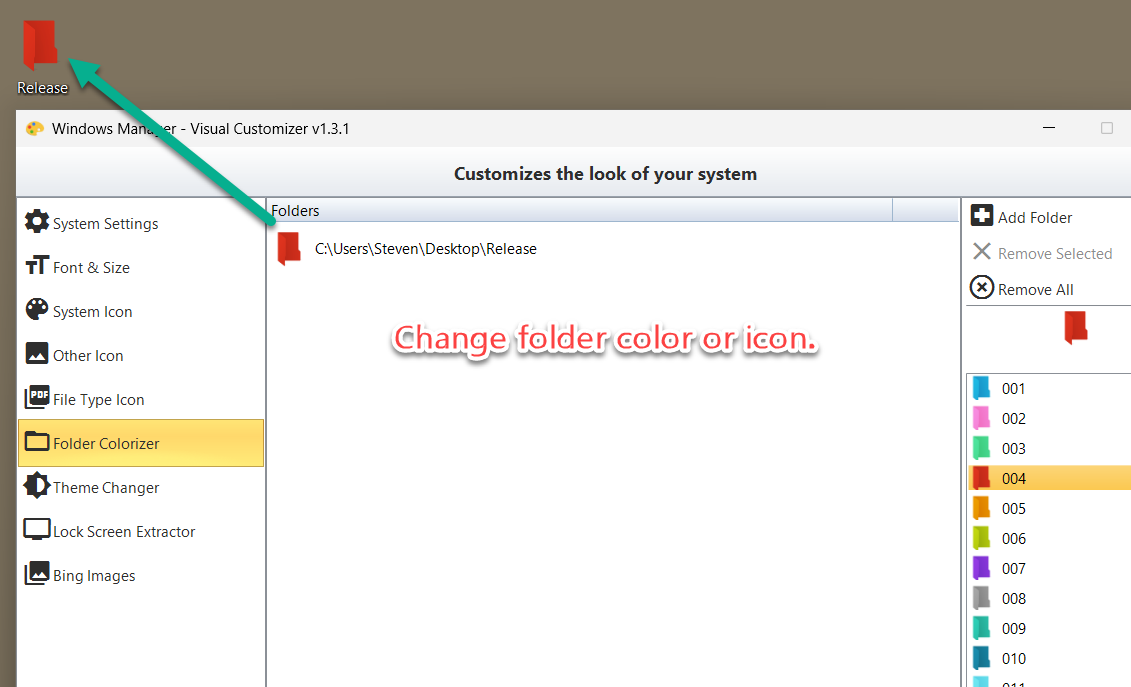
- Folder coloring. Use Folder Colorizer to give a folder a color or custom icon so it stands out on the desktop and in Explorer.
- Themes, lock screen, and wallpaper assets. Theme Changer manages themes; Lock Screen Extractor exports lock screen images; Bing Images opens the Bing wallpaper tool.
It complements cleanup tools: Visual Customizer focuses on appearance and icons; for freeing space or uninstalling programs, pair it with Duplicate Files Finder and Smart Uninstaller.
2. How to open Visual Customizer
In the Windows Manager main window:
Customization → Visual Customizer
It opens as a separate window. Download a trial from the download page if needed. When changing system icons or OEM information, run as administrator, then refresh Explorer or sign out/in if required to see the result.
3. Main window
The window is roughly divided into:
- Top title area: centered caption “Customize the visual appearance and interface styles of Windows”; top-right ? for a short tip; the footer link can open this online help article.
- Left navigation: System Settings, Font & Size, System Icon, Other Icon, File Type Icon, Folder Colorizer, Theme Changer, Lock Screen Extractor, Bing Images.
- Center work area: changes with the selected module; most modules include tabs, icon grids or lists, and Change / Restore / Save / Apply buttons.
- Status bar: shows the current module name (e.g. System Settings, Font & Size).
4. System Settings (Properties 1 / 2 / 3)
Select System Settings on the left. The center pane has three Properties tabs, with Restore and Save at the bottom, plus a shortcut to Settings – Display.
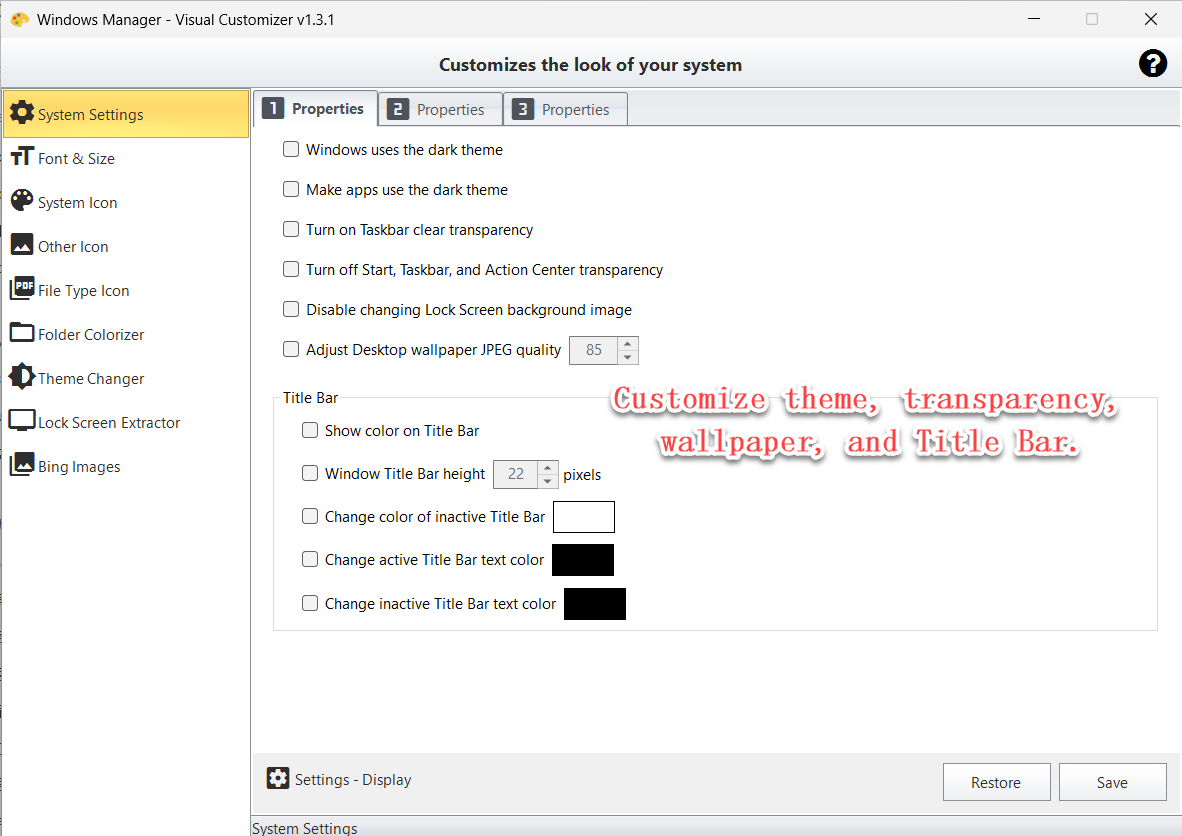
Properties 1: theme, transparency, wallpaper & title bar
Enable and adjust options such as Windows / apps dark theme, taskbar transparency, Start and Action Center transparency, prevent changing the lock screen background, desktop wallpaper JPEG quality, and title bar coloring, height, and active/inactive caption text and background colors. Check the items you need, then click Save.
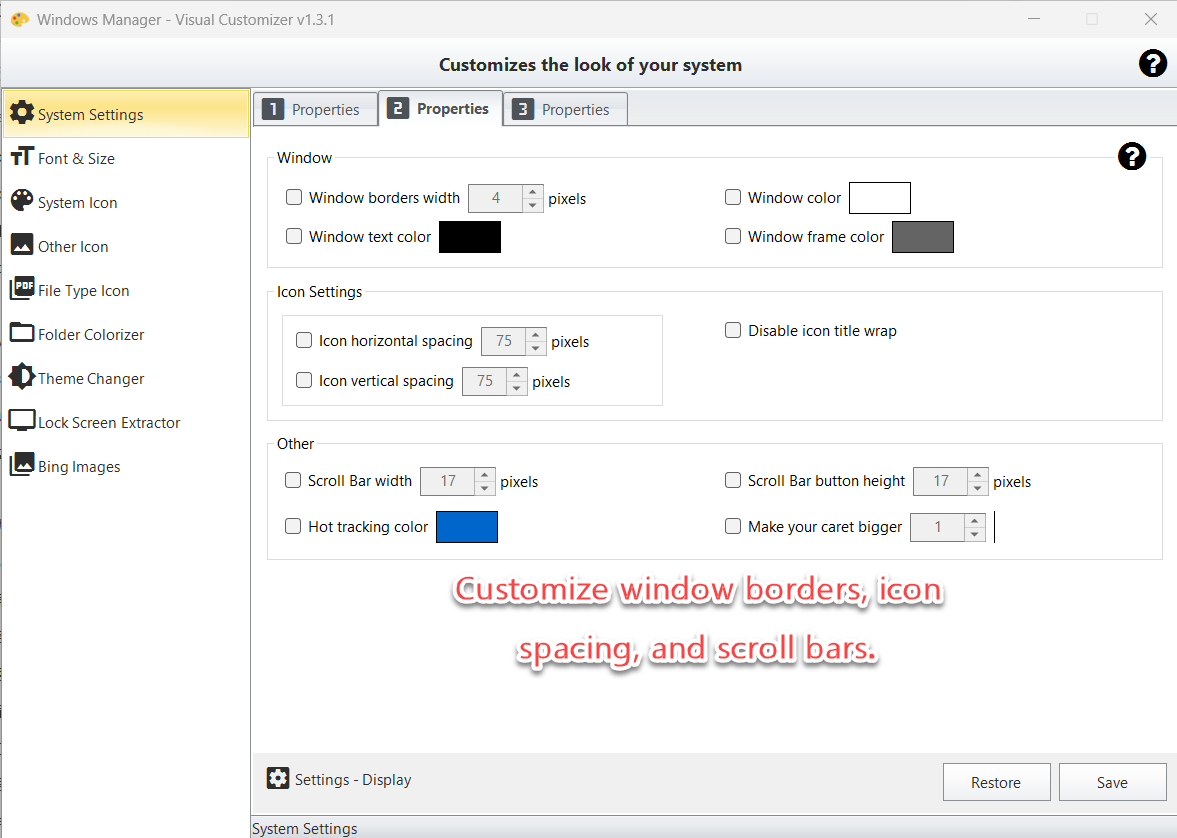
Properties 2: window borders, icon spacing & scroll bars
Includes Window (border width, window color, text color, border color), Icon settings (horizontal/vertical spacing, prevent icon title wrapping), and Other (scroll bar width and button height, hot-tracking color, thicker insertion-point cursor). Check items, then Save.
Properties 3: OEM Information
The third Properties page edits OEM Information (manufacturer, model, support phone/URL/hours, logo, and so on). After saving, it can appear under system/device information. Do not fill this in unless you know why you need it.
5. Font & Size
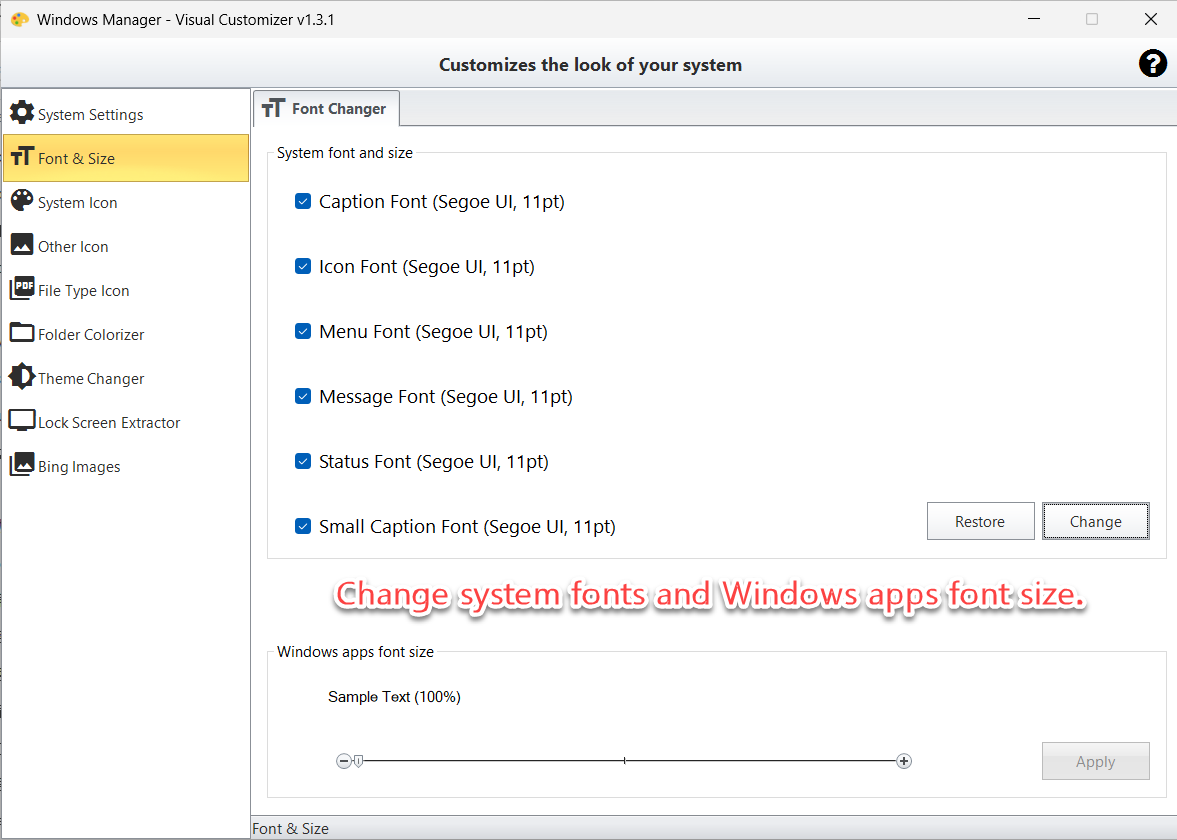
Select Font & Size on the left to open Font Changer:
- System font and size: check caption font, icon font, menu font, message font, status font, small caption font, and more; use Change to pick a font and Restore to revert.
- Windows apps font size: use the slider to scale app text, preview the sample, then click Apply.
6. System Icon (Shell / Drive / Control Panel)
System Icon on the left has three tabs:
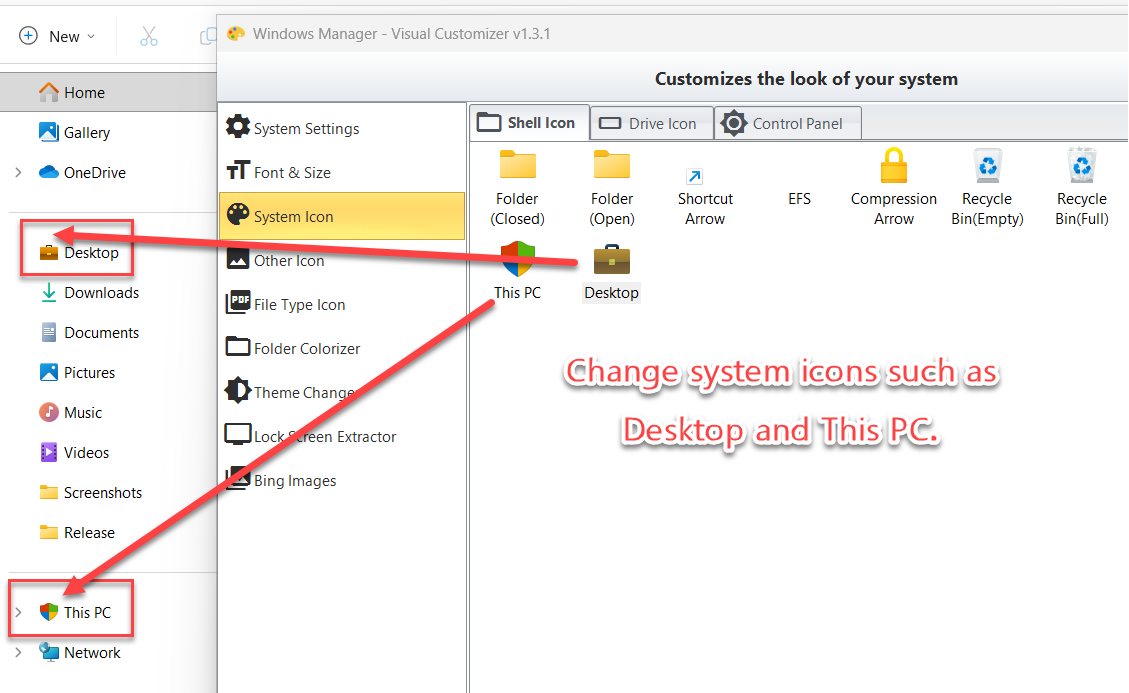
Shell Icon
Change Desktop, This PC, Recycle Bin, folder, shortcut arrow, and other shell-related icons. Select an icon and use Change Icons; use Restore Selected or Restore all to revert. Click Apply when done.
Drive Icon
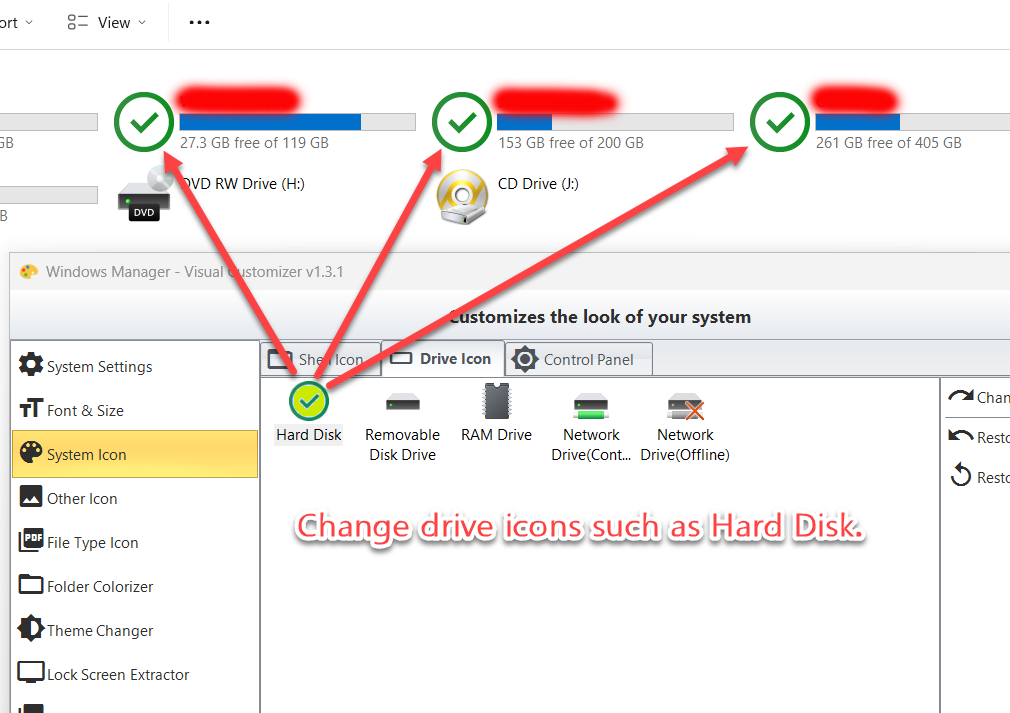
Replace icons by drive type—for example Hard Disk, removable disk, RAM drive, and network drives (connected/offline). Useful when you want all local hard disks to share one custom icon.
Control Panel
Browse and change Control Panel item icons; sort by name ascending/descending; change, rename, or restore.
7. Other Icon (Partition Icon / Library Icon)
Other Icon is for finer-grained icon customization:
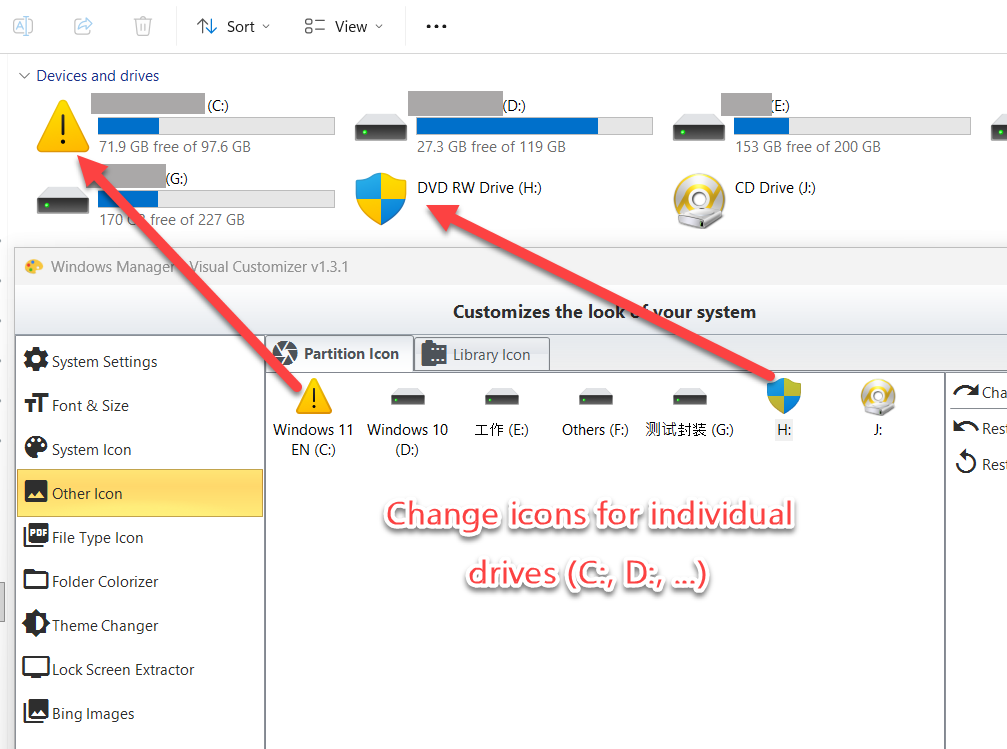
- Partition Icon: set an icon per drive letter (C:, D:, …), unlike Drive Icon which changes by type. Select a partition, then Change Icons, or Restore Selected / Restore all.
- Library Icon: change icons for Documents, Pictures, and other libraries; change and restore are supported.
Click Apply, then check the result in File Explorer.
8. File Type Icon
File Type Icon lists extensions and file types. Use the top-right search (e.g. type zip) to find items quickly; Red=Modified marks changed entries. Select an item, then Change Icons, or Restore Selected / Restore all. Switch among List, Small Icons, and Large Icons views as needed.
9. Folder Colorizer
Folder Colorizer lets you change a folder’s color or custom icon:
- Click Add Folder and choose the target directory (you can also open only this module from a related Explorer context-menu entry). You can also drag multiple folders from File Explorer directly into the list on the left for faster batch adding.
- Pick a color or icon preset on the right.
- Use Remove Selected or Remove All to clear coloring; use Restore-related actions to revert appearance.
Handy for distinguishing work folders, release packages, and temporary directories by color.
10. Theme, lock screen & Bing Images
Three more side-bar modules (no separate screenshots in this guide; use them from the UI):
- Theme Changer: manage light/dark and related theme items; apply or remove themes.
- Lock Screen Extractor: extract images from the Windows lock screen cache; open or export favorites.
- Bing Images: launches the Bing Images tool (BingImages.exe) to browse or download daily Bing wallpapers.
11. Notes
- Check, then Save/Apply. System Settings pages usually require enabling an option with a check box; unchecked items are not written.
- Refresh may be required. Icon or font changes sometimes need F5, restarting Explorer, or signing out before they fully appear.
- Keep restore options. Most modules offer Restore Selected / Restore all; note the default look before large changes, or test with a few items first.
- Administrator rights. Changing system-level icons or OEM information may require elevation.
- Do not confuse critical system icons. If you are unsure about a shell or Control Panel item, restore it or change non-critical items first.
- Folder coloring applies only to added paths. After moving a folder you may need to add it again; removing coloring does not delete the folder.
12. Typical workflow
- Customization → Visual Customizer.
- In System Settings, adjust theme, title bar, or icon spacing as needed, then Save.
- To unify fonts, open Font & Size, change system fonts or apps font size, then Apply.
- For Desktop / This PC or Hard Disk icons: use System Icon; for per-letter C:/D: icons: use Other Icon → Partition Icon.
- For .zip and similar types use File Type Icon; to color work folders use Folder Colorizer.
- To save lock screen or Bing wallpapers, open Lock Screen Extractor or Bing Images.
Try it now
Visual Customizer sits with Windows Manager’s other customization and maintenance tools. See the product page for more; for disk cleanup or uninstalling programs, also try Duplicate Files Finder and Smart Uninstaller.
Get started: Download Windows Manager — open Customization → Visual Customizer, start with System Settings or System Icon, change a little at a time, and use Restore whenever you need to revert.
