On Windows 10 and Windows 11, folders such as Documents, Pictures, Downloads, and Desktop live on the system drive by default (usually C:). Over time they consume a lot of space and make reinstalls and backups harder.
Move System Folders in Windows Manager lets you redirect these known folders to another drive or path, with optional file migration. The sections below explain when it is worth using, which folders to move, how each option works, and what to do step by step.
1. Why move system folders?
The built-in help text covers the main reasons. In practice, people use it for these situations:
Free space on the system drive. Documents, pictures, videos, and downloads are often the largest folders. Moving them to D: or another data drive leaves more room for Windows updates and apps.
Protect personal data from system issues. Once folders sit on a separate partition, a Windows reinstall is less likely to wipe your files.
Reduce fragmentation and I/O contention. Heavy writes on the system SSD can be offloaded to a HDD or secondary drive.
Share data across dual-boot setups. Placing user folders on a non-system partition makes them easier to use from multiple Windows installations.
SSD + HDD layouts. Many PCs boot from SSD and store bulk data on HDD. The tool suggests moving important folders like Documents to the HDD—slower, but often easier to recover if the SSD fails; keep OS and apps on SSD for speed.
Centralized management. Unlike changing one folder at a time via Properties → Location in File Explorer, this tool lists all known folders with path, size, and status in one place and supports batch moves.
2. How to open Move System Folders
In the Windows Manager main window, go to:
Security → Files and Folders → Move System Folders
File Security and Move System Folders share the same entry screen: encryption tools on top, Move System Folders below. Clicking it launches the dedicated Move System Folders window.
Get the trial from the download page if you have not installed Windows Manager yet.
3. Main window: list, colors, and columns
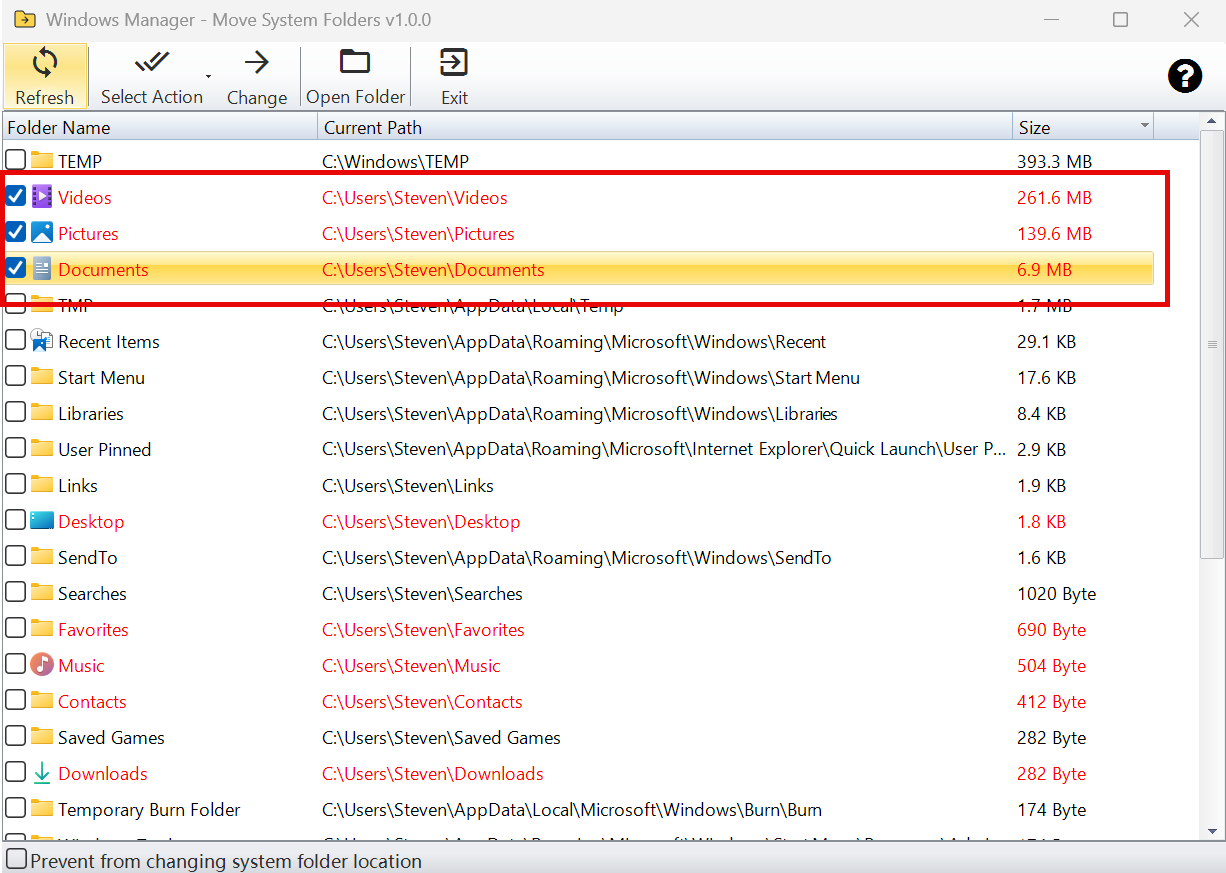
The tool scans known folders plus TEMP/TMP environment paths. The list shows three main columns:
- Folder Name: Documents, Pictures, Music, Downloads, Desktop, and similar items.
- Current Path: Where the folder points today.
- Size: Disk space used at that path—helpful when deciding what to move first.
Click the Size column header to sort ascending or descending. With descending sort, the largest folders (for example TEMP, Videos, Pictures) appear at the top so you can see what uses the most space on the system drive and choose what to move first. Together with red (recommended) markers, that makes it easier to free space without guessing.
Checkboxes on each row select items for transfer. The help button in the top-right corner repeats the built-in rationale for moving folders.
Color coding:
- Red: recommended to move; still on the default system location.
- Green: already redirected away from the default path.
- Normal text: not in the recommended list—leave as-is unless you have a specific reason.
4. Which folders are recommended?
These folders show in red when still on the default path: Documents, Videos, Music, Pictures, Downloads, Favorites, Contacts, Desktop.
These appear in the list but are not recommended by default: Searches, Links, Saved Games, OneDrive, ScreenShots, Libraries, Administrative Tools, Network Shortcuts, Recent Items, SendTo, Start Menu, Startup, Templates, User Pinned, Printer Shortcuts, Ringtones, History, Temporary Burn Folder, Temporary Internet Files, Cookies, TEMP, TMP, and others.
Start with Documents, Pictures, Downloads, and Desktop. Move Videos and Music if they are large. Avoid moving Start Menu, Startup, or similar system-structure folders unless you know the impact.
5. Toolbar: selecting folders
Toolbar buttons on the main window:
- Refresh (F5): Rescan paths and sizes. After a successful transfer or restore, closing the confirm dialog automatically refreshes the main list; press F5 manually if you changed paths outside the tool or the UI looks stale.
- Select Action:
- Select all — check every folder in the list.
- Deselect all — clear all checkboxes.
- Select all recommended items — check red folders only; best for beginners.
- Select all changed items — check green folders already moved off the default path.
- Change: Open the transfer dialog for checked folders (enabled when at least one is checked).
- Open Folder: Open the selected path in Explorer (double-click a row works too).
- Exit: Close the tool.
6. Transfer dialog: target path and File Options
After you check folders and click Change, the transfer dialog has three areas:
1) Folders to transfer — Shows checked items with current path and size. Use Edit to change one target path or Remove to drop an item from this run. Invalid paths are rejected.
2) Target Location — Pick a parent folder (for example D:\UserData). The tool creates subfolders per item (D:\UserData\Documents, D:\UserData\Pictures, and so on). Different targets per row are also supported.
3) File Options — Choose one:
This is the part most people get wrong, so read it carefully:
- Move File: Move existing files to the new path; originals are removed. Use when you are sure and want to free the system drive.
- Copy File: Copy files to the new path and keep originals. Selected by default—the safest choice for a first move.
- Do Nothing: Only redirect the folder path (registry / Known Folders); no file move or copy. Use when files are already at the destination.
The tool creates the target folder, redirects via Windows Known Folders, and shows success or error per row.
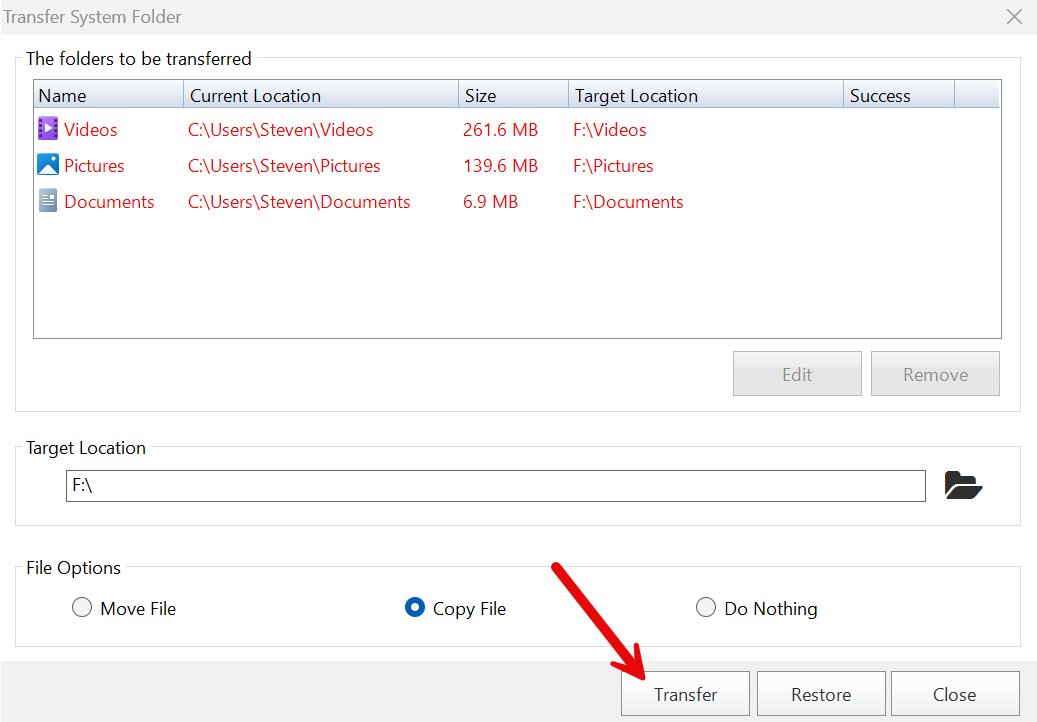
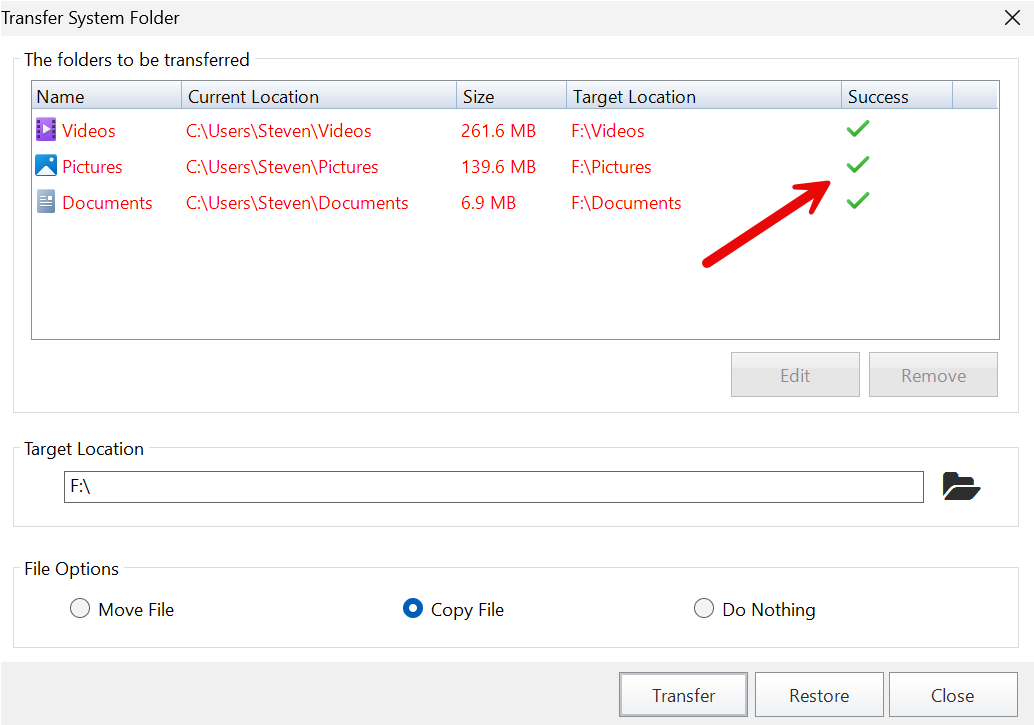
Click Transfer after setting the target. A confirmation shows the File Option you chose. During the transfer, the Success column on the right shows a green checkmark or error icon per row.
7. Restore to default locations
In the same dialog, Restore returns folders to Windows default paths. File Options apply the same way (move, copy, or path-only). Missing default folders are created when possible.
8. After a successful transfer
When you close the dialog after success, the main list rescans automatically: moved folders turn green with updated paths (for example from C: to F: or D:). Recommended folders still on the default system location remain red. The program prompts you to restart Explorer so the shell shows new locations immediately. TEMP/TMP changes may need a saved restart to fully apply.

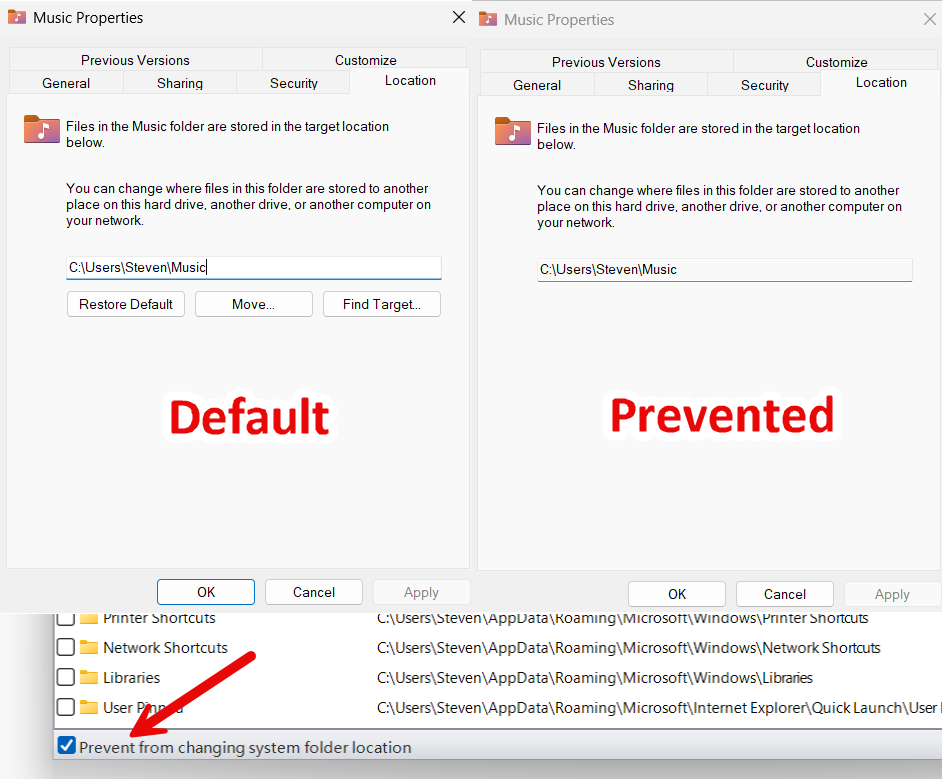
9. Prevent from changing system folder location
A checkbox at the bottom of the main window blocks users from relocating Documents, Pictures, and similar folders via File Explorer Properties → Location—useful to lock in your configuration. The setting is saved to group-policy-related registry values immediately. Leave it unchecked if you still want manual changes in Explorer.
10. Important notes
- Back up important data before the first large move.
- Use a stable NTFS partition with enough space—not USB, network, or removable drives.
- Prefer Copy File on the first run; delete old copies only after verifying apps and files work.
- Check OneDrive sync rules before moving the OneDrive folder.
- Do not batch-move Start Menu, Startup, or Templates without understanding the risk.
- Close apps that lock files in the folders you are moving.
Tip: Try moving Documents and Downloads first on one PC. Confirm Office, your browser, and other apps read and write normally before batch-moving the rest.
11. Quick workflow
- Windows Manager → Security → Files and Folders → Move System Folders.
- On the main list, click the Size column to sort by disk usage, or use Select Action → Select all recommended items, or pick folders manually.
- Change → choose a parent folder on your data drive (for example
D:\Data). - Keep File Options on Copy File (or Move File if you are confident).
- Transfer → confirm → check success icons.
- Close the dialog; the main list refreshes; restart Explorer when prompted.
- After verification, remove redundant copies on the system drive if you used Copy.
Try it now
If you want a cleaner system drive, safer personal data, and less hassle when reinstalling Windows, Move System Folders is one of the most useful tools in the Security category. It complements File Security and privacy tools in Windows Manager: one handles paths and disk space, the other encryption and access control.
Download Windows Manager and open Security → Files and Folders.