After years of browsing, your favorites inevitably fill up with links that no longer open. You may want to block a website without hand-editing C:\Windows\System32\drivers\etc\hosts, or make a child’s or office PC open only approved websites—without an easy tool to do it.
URL Manager in Windows Manager brings these jobs together in one window: Favorites Checker tests every link in your Microsoft Edge and Google Chrome favorites and removes dead ones in one go; Host Editor edits the Hosts file as a list, so you can block websites, resolve IP addresses, back up and restore; URL Blocker sets a Block Mode (blocklist) or Allow Mode (allowlist) for Edge, Chrome and Firefox.
Below: how to open it, what every button and setting does, and what to watch out for. Screenshots match the real window. Hover over the ? icon at the top right of the program for a short tip, then click Online Help at the bottom of the tip to open this article.
1. What can URL Manager do?
- Find dead favorites. Reads your Edge (Chromium) and Chrome favorites automatically, visits every URL using multiple threads, highlights unreachable entries in red and shows why they failed.
- Remove broken links in bulk. After a check, dead URLs are checked automatically—click Delete to remove them from your local favorites instead of hunting for them one by one in the browser.
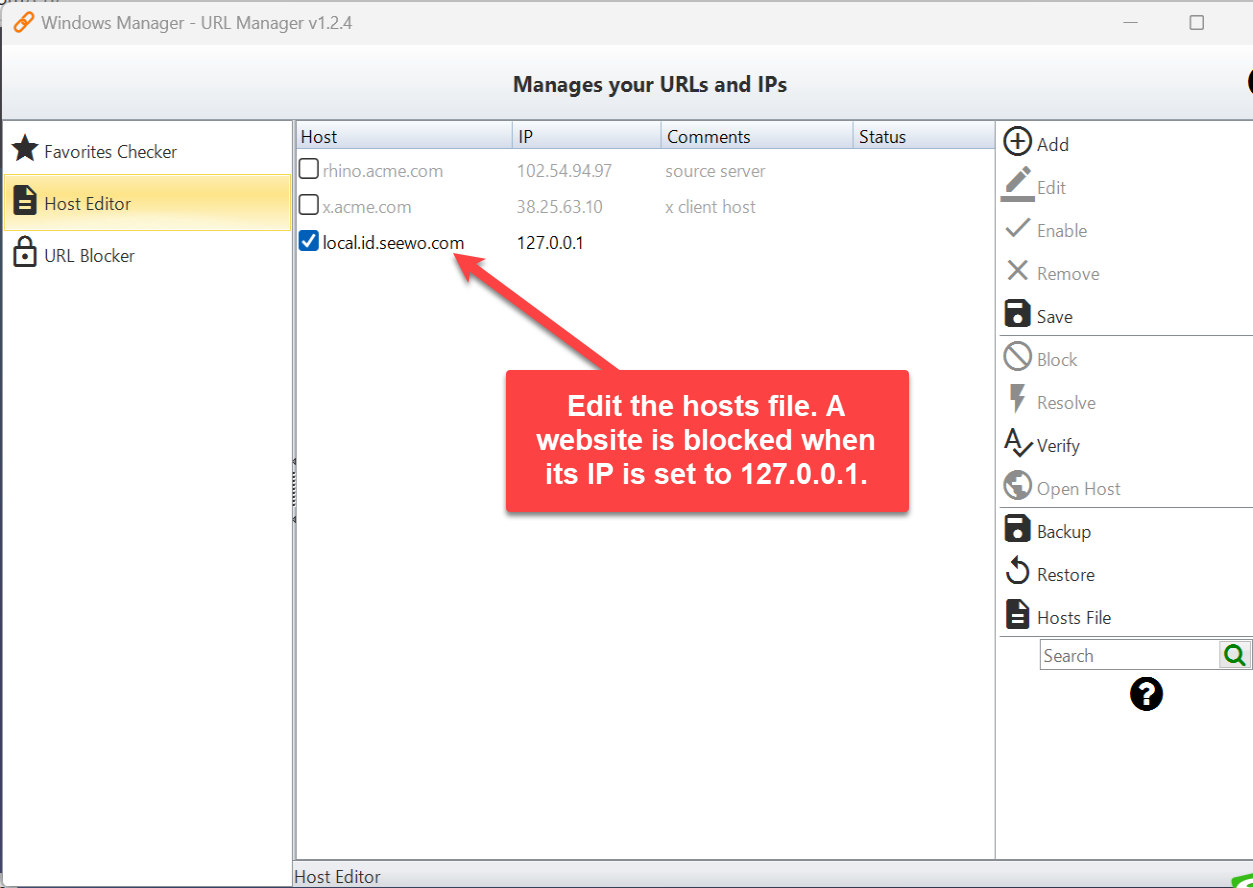
- Edit the Hosts file visually. Shows Hosts entries in a Host / IP / Comments / Status table where you can add, edit, enable/disable and remove entries—no Hosts syntax to remember.
- Block websites. Point a site to
127.0.0.1in Host Editor, or add its domain to the URL Blocker list, and it will no longer open. - Allow only selected websites. URL Blocker’s Allow Mode lets browsers open only listed sites; Host Editor’s Permit Only can additionally restrict a network adapter to the hosts in the Hosts file.
- Back up and restore the Hosts file. One click to back up before changes, one click to restore if something goes wrong.
It complements Settings Security: Settings Security restricts system settings and features, while URL Manager handles web addresses and website access.
2. How to open URL Manager
In the Windows Manager main window:
Network → URL Manager
The button description reads “Manage URLs, Hosts and website access”. It opens as a separate window (caption “Windows Manager - URL Manager”). Download a trial from the download page if needed. Changing the Hosts file, browser policies and adapter DNS requires administrator rights, so run Windows Manager as administrator.
3. Main window
- Tool list on the left: Favorites Checker, Host Editor and URL Blocker—click to switch. The left panel can be resized; window size and panel width are remembered when you close the program.
- Title bar at the top: shows “Manage URLs, Hosts and website access”. The ? icon at the top right shows a short description and the Online Help link.
- Work area on the right: the list and buttons of the current tool. Host Editor and URL Blocker each have their own ? in the button bar that explains how the Hosts file works and the difference between block and allow mode.
- Status bar at the bottom: shows the current tool, the total number of favorites, and progress while checking (for example
12/86).
4. Favorites Checker: find and delete dead links
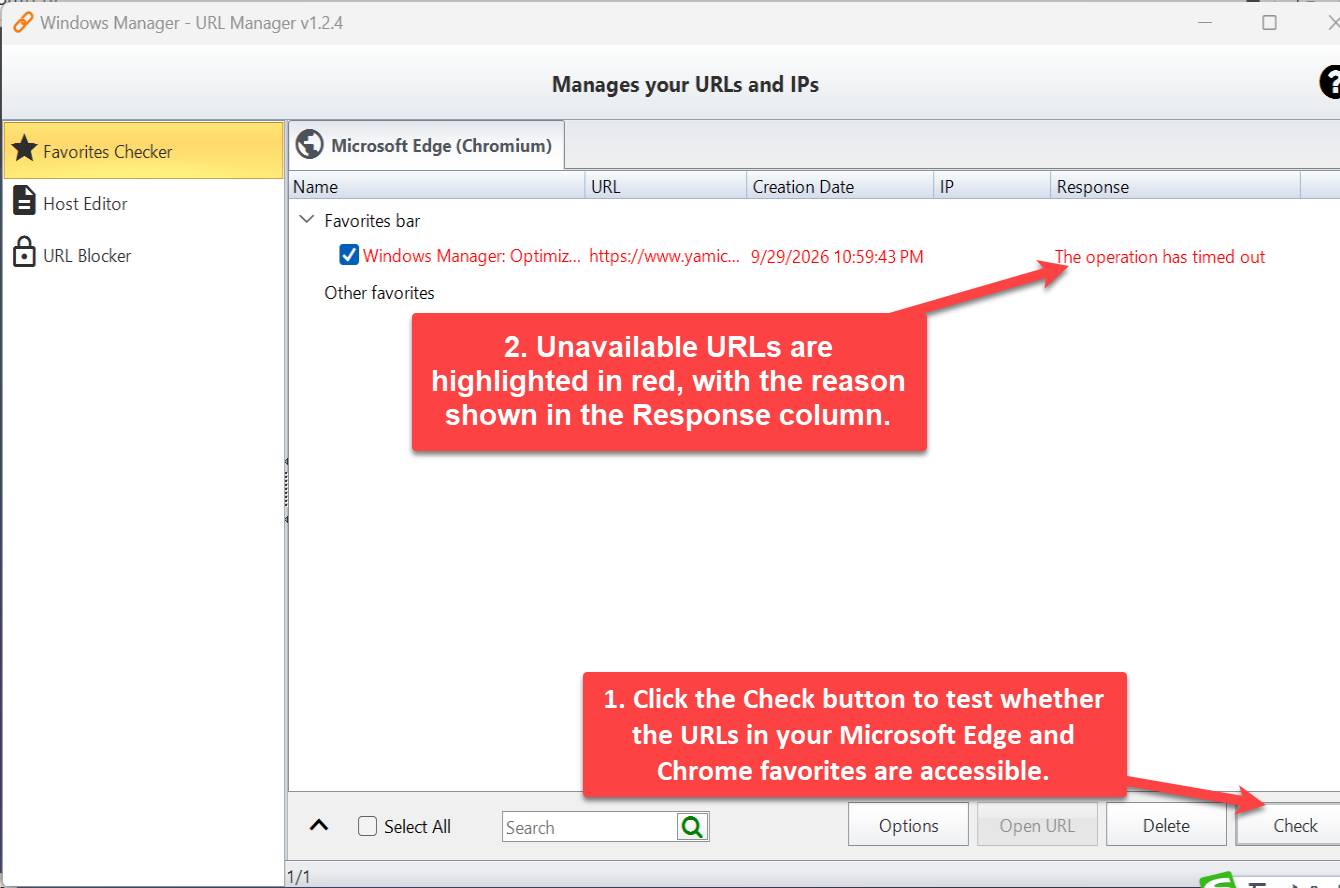
When opened, the tool reads the favorites of the browser’s default profile (Default), with one tab per browser: Microsoft Edge (Chromium) and Google Chrome. A browser that is not installed or has no favorites file gets no tab. Favorites are shown as a tree (Favorites bar, Other favorites and their subfolders) with the columns Name, URL, Creation Date, IP and Server Response.
How to check
- Select the browser tab you want to check.
- Click Check at the bottom right. The tool visits several URLs at once, using the number of threads set in Options. Server Response first shows “Connecting...”, then the result; the status bar shows progress.
- While checking, the button changes to Stop so you can cancel at any time.
- When finished, the status bar shows “Favorites check completed, found invalid URLs” with the count.
Reading the results
- Reachable: Server Response shows
OK, the IP column shows the address the site resolves to, and the entry stays unchecked. - Unreachable: the row turns red and is checked automatically; Server Response shows the reason, such as “The operation has timed out”, “(404) Not Found” or “The remote name could not be resolved”.
- Skipped: favorites that don’t start with http/https (such as
edge://andchrome://internal pages,javascript:bookmarklets orfile:local files) cannot be tested online. Server Response shows “Skipped”; the entry is not highlighted, not checked, and never treated as a dead link.
Handling dead links
- Open URL: select an entry and click to open it in your default browser, so you can confirm it is really dead.
- Delete: deletes all checked entries (you can also press Delete). A prompt reminds you that only URLs in your local bookmarks are removed, and that they may come back if bookmark sync is enabled with your browser account.
- Select All: checks or unchecks all entries currently shown in the tab; when a search filter is active, only the filtered results are checked.
- Search: type a keyword to filter names or URLs instantly; the number of matches is shown on the button at the right of the search box.
- Arrow at the bottom left: expands or collapses all favorites folders.
5. Favorites Checker options
Click Options in Favorites Checker:
- URL check timeout: how many seconds to wait for each URL, from 5 to 30; the default is 5 seconds. Increase it on a slow connection or for sites hosted far away to reduce false alarms.
- Number of threads: how many URLs are checked at the same time, from 1 to 20. More threads are faster, but too many can trigger rate limits on some websites and cause false results.
- Default: resets both the timeout and the thread number to 5.
Click OK to save or Cancel to discard. Options cannot be opened while a check is running.
6. Host Editor: edit the Hosts file visually
The Hosts file maps host names to IP addresses. When you visit a website, Windows checks the Hosts file first; if it finds an entry, it uses that IP instead of asking a DNS server. That means: mapping frequently used sites to their correct IP skips the DNS lookup, and pointing a site to the local address 127.0.0.1 sends every request back to your own PC—effectively blocking that website.
Host Editor reads the Hosts file (creating it if it doesn’t exist) and lists Host, IP, Comments and Status. The checkbox in front of each entry shows whether it is enabled: unchecked entries are grayed out and saved as # comments, so they have no effect. If the PC has no Internet connection, you will see “No Internet connection.” when opening it.
Buttons on the right
- Add ▸ Add Permitted: adds a host in edit mode. Type a domain (such as
example.com) and the tool resolves its real IP with nslookup and fills it in. - Add ▸ Add Blocked: adds a host with the IP
127.0.0.1; type a domain to block that website. - With either option, typing
example.comautomatically addswww.example.comas well (or the version without www if you typed www), because the Hosts file only matches complete host names. - Edit ▸ Host / Comments: changes the host name or comment of the selected entry; you can also double-click the Host or Comments cell. Invalid host names and duplicates are rejected.
- Enable / Disable: turns the selected entry on or off—the same as clicking its checkbox.
- Remove: removes the selected entry from the list.
- Save: writes the list to the Hosts file. Comments, blank lines and unchanged entries in the original file are kept as they are; changed entries are rewritten, removed entries are deleted, and new entries are appended to the end. Changes in the list take effect only after you click Save.
- Block: changes the IP of the selected entry to
127.0.0.1to block an existing host quickly. - Resolve: looks up the current real IP of the selected host and fills it in—useful after a website moves to a new server.
- Verify ▸ Verify Selected / Verify All: pings the IP and shows “Accessible” or “Unknown” in the Status column.
- Open Host: opens
http://hostnamein your browser to test blocking or resolution. - Backup: choose a folder and the current Hosts file is copied as
hosts(yyyyMMdd), for examplehosts(20261001). A second backup to the same folder on the same day gets a time stamp, for examplehosts(20261001_153012), so earlier backups are never overwritten. - Restore: choose a backup file to replace the current Hosts file and reload the list; it takes effect immediately.
- Hosts File: opens the whole Hosts file as plain text for users who know the syntax; click Save to write it.
- Search: type a keyword to filter entries quickly.
Right-click an entry for a shortcut menu with Open Host, Verify, Edit and Remove.
7. Permit only the hosts in the list to access the internet
The Permit Only button below Host Editor’s button bar opens the “Permit only the hosts in the list to access the internet” dialog. It works by setting the DNS of the selected network adapter to 127.0.0.1: only hosts written in the Hosts file with a real IP can be resolved and reached, and every other website fails to open. Software that connects directly by IP, such as instant messengers, is not affected.
- Select the Network: choose the adapter to restrict; the connection ID, connection status, current DNS and applied status are shown below.
- Prevent manual changes to IP configuration: when checked, Windows’ “Network Connections” is hidden so nobody can switch the DNS back by hand; unchecking it restarts File Explorer to restore the entry.
- Apply: saves the Hosts list, records the adapter’s original DNS, sets the DNS to
127.0.0.1and checks “Prevent manual changes to IP configuration” automatically. If the list contains no enabled, unblocked host that is accessible (or not yet verified), you are warned “You will be unable to access any websites on the internet, continue?”. - Restore: returns the adapter DNS to its settings before Apply—back to automatic if it was “Obtain DNS server address automatically”, or to the saved preferred and alternate DNS servers if they were set manually—and unchecks “Prevent manual changes to IP configuration” so normal browsing resumes.
Before applying, use Add Permitted in Host Editor to add the websites that should stay reachable, and make sure their IPs resolved correctly.
8. URL Blocker: website blocklist or allowlist for Edge, Chrome and Firefox
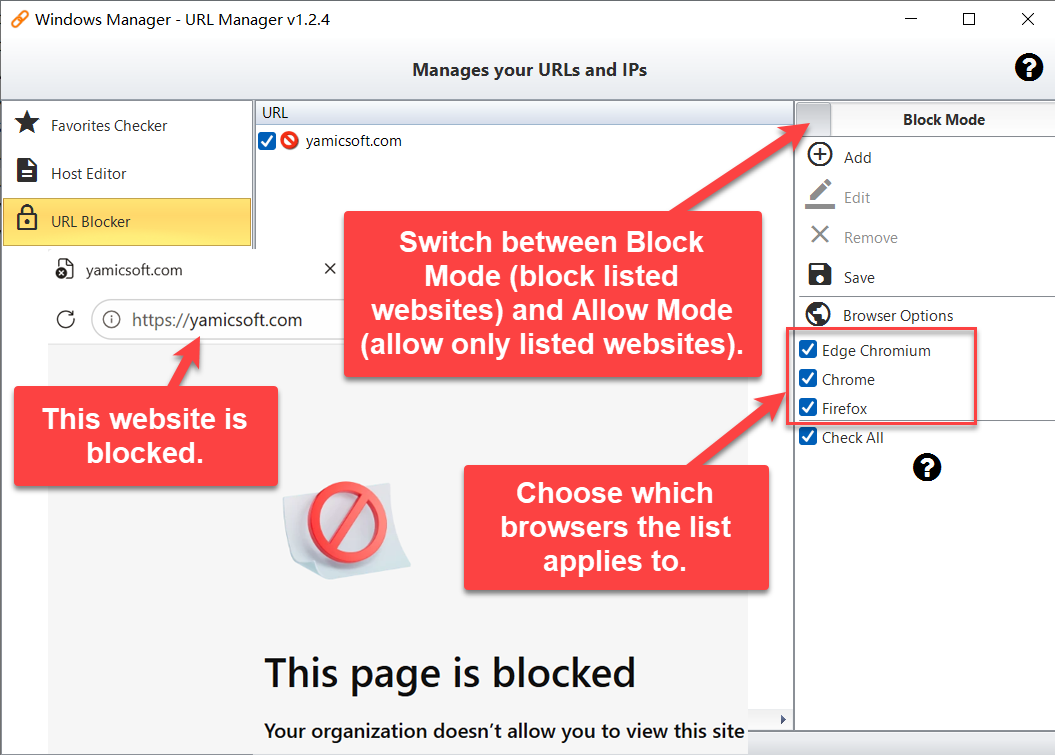
URL Blocker controls website access through the browsers’ officially supported policies. A blocked website shows a message such as “This page is blocked” in the browser.
Two modes
- Block Mode: the selected browsers cannot open the listed websites; all other sites work normally (blocklist).
- Allow Mode: the selected browsers can open only the listed websites; everything else is blocked (allowlist)—ideal for children’s PCs or dedicated office PCs.
Click the mode switch at the top right to change between the two modes.
Editing the list
- Add: adds a row in edit mode; type a domain such as
microsoft.com. If you paste a full URL, the domain is extracted automatically; invalid domains are removed and duplicates trigger “The same item already exists in the list.” - Edit / Remove: changes or removes the selected domain.
- Checkbox: only checked domains (shown with a block icon) take effect; uncheck one to pause a rule without deleting it.
- Check All: checks or unchecks all domains at once.
- Each domain also covers all of its subdomains, so
yamicsoft.comalso matcheswww.yamicsoft.com.
Browser Options and saving
- Browser Options: choose the browsers the rules apply to—Edge Chromium, Chrome, Firefox. At least one must stay selected.
- Save: writes the list and mode to the policies of the selected browsers and shows “The setting has been completed. Please restart the browsers for changes to take effect.” For browsers that are not selected, any existing rules are cleared when you save.
9. Hosts file or URL Blocker—which should you use to block websites?
- Scope: the Hosts file affects every program on the PC; URL Blocker affects only Edge, Chrome and Firefox.
- Matching: the Hosts file matches complete host names only, so
example.com,www.example.comandm.example.commust be added separately; one URL Blocker entry covers all subdomains. - Allowlist: to allow only certain websites in the browser, prefer URL Blocker’s Allow Mode; use Host Editor’s Permit Only when the whole PC must be restricted.
- When changes apply: Hosts changes usually take effect right after saving (some browsers cache DNS—restart the browser); URL Blocker changes require a browser restart.
10. Notes
- Administrator rights are required. Writing the Hosts file, browser policies and adapter DNS needs administrator rights, so run Windows Manager as administrator.
- Close the browser before deleting favorites. A running browser keeps favorites in memory and may later overwrite the changes; with account sync enabled, deleted URLs may also be synced back.
- Only the default profile is read. Favorites Checker reads the Default profile of Edge and Chrome; favorites in other browser profiles are not shown.
- “Unreachable” is not always dead. Temporary outages, sites that require sign-in, sites that reject quick automated checks, or network hiccups can all make a check fail. Confirm with Open URL before deleting, or raise the timeout and check again.
- Checking a folder deletes everything in it. A checked favorites folder is removed together with all URLs inside it, so review your selection carefully.
- Back up before changing the Hosts file. Saving keeps comments and other lines of the original file, but changed entries still affect browsing immediately. Back up first; a line with several host names shows only the first one in the list, so edit such lines with the Hosts File button.
- Security software may block Hosts changes. Some antivirus and security tools protect the Hosts file. If saving fails or is reverted, allow the change in your security software.
- Permit Only changes the adapter DNS. The tool records the DNS settings before Apply and restores them automatically; click Restore on the same adapter. If you changed the adapter settings by hand after applying, check the DNS in the adapter properties after restoring.
- URL Blocker applies to all users. Rules are written to the browser policies of this PC, so every Windows account is affected, and browser settings may show “Managed by your organization”—this is expected.
- List every required site in Allow Mode. Many websites load sign-in, images or scripts from other domains; allowing only the main domain can break pages, so add the extra domains you need.
- Unselecting a browser clears its rules. If you uncheck a browser in Browser Options and save, its existing block/allow rules are deleted.
11. Typical workflows
Scenario 1: clean up dead links in your favorites
- Close Edge and Chrome.
- Windows Manager main window → Network → URL Manager → Favorites Checker.
- Select a browser tab, click Check and wait until it finishes.
- Review the red entries and their Server Response, confirm doubtful ones with Open URL, and uncheck any URL you want to keep.
- Click Delete and confirm.
Scenario 2: block a website
- Browsers only: open URL Blocker, switch to Block Mode, click Add and type the domain, select the browsers, click Save and restart the browsers.
- All programs: open Host Editor, click Backup first, then Add ▸ Add Blocked, type the domain and click Save.
Scenario 3: let browsers open only approved websites
- Open URL Blocker and switch to Allow Mode.
- Add each allowed domain and make sure it is checked.
- Select Edge Chromium, Chrome and Firefox in Browser Options, click Save, then restart the browsers and test.
Try it now
URL Manager belongs to the same toolbox as the other network and security tools in Windows Manager. Learn more on the product page; to restrict system settings and features further, use Settings Security; to see which programs are using network and system resources, use Process Manager.
Get started: Download Windows Manager — open Network → URL Manager, clean up dead links with Favorites Checker first, then set up website blocking rules as needed.
